Difference between revisions of "mosCura:Configurator"
(→Rules) |
|||
| (12 intermediate revisions by the same user not shown) | |||
| Line 1: | Line 1: | ||
| − | == | + | ==Overview== |
mosCura Configurator is a tool that can be used to create communication protocols among different tools in the production cycle. | mosCura Configurator is a tool that can be used to create communication protocols among different tools in the production cycle. | ||
| Line 8: | Line 8: | ||
<gallery> | <gallery> | ||
| − | File: | + | File:mosCura_Configurator_FinishedExample.png|Finished configuration |
</gallery> | </gallery> | ||
| − | == | + | ==Configuration Setup== |
| − | Before you proceed reading the process of a new configuration setup, it is recommended to read the [[mosCura:Configurator# | + | Before you proceed reading the process of a new configuration setup, it is recommended to read the [[mosCura:Configurator#Rules|Rules of the Configurator]]. |
| − | === | + | ===Configuration Process=== |
| − | + | The following steps are the process of how to create a Section Group Configuration. | |
| − | The following steps are the process of how to create a | ||
# Create a new Section Group | # Create a new Section Group | ||
| Line 23: | Line 22: | ||
# Add 1 or multiple Item Groups in the Section Group | # Add 1 or multiple Item Groups in the Section Group | ||
# Add 1 or multiple Items in each Item Group | # Add 1 or multiple Items in each Item Group | ||
| − | |||
| − | |||
| − | === | + | ===mosCura Configurator=== |
In the Configurator page, it is possible to edit or delete the Section Group and create, edit or delete Data Handler, Item Group and Items. | In the Configurator page, it is possible to edit or delete the Section Group and create, edit or delete Data Handler, Item Group and Items. | ||
| Line 37: | Line 34: | ||
===Data Handler=== | ===Data Handler=== | ||
[[mosCura:Configurator_DataHandler|Data Handler]]<br /> | [[mosCura:Configurator_DataHandler|Data Handler]]<br /> | ||
| − | |||
| − | |||
| − | |||
| − | |||
| − | |||
| − | |||
| − | |||
| − | |||
| − | |||
| − | |||
| − | |||
| − | |||
| − | |||
| − | |||
| − | |||
| − | |||
| − | |||
| − | |||
| − | |||
| − | |||
| − | |||
| − | |||
| − | |||
| − | |||
| − | |||
| − | |||
| − | |||
| − | |||
| − | |||
| − | |||
| − | |||
| − | |||
| − | |||
| − | |||
| − | |||
| − | |||
| − | |||
| − | |||
| − | |||
| − | |||
| − | |||
| − | |||
| − | |||
| − | |||
| − | |||
| − | |||
| − | |||
| − | |||
| − | |||
| − | |||
| − | |||
| − | |||
| − | |||
| − | + | ===Item Group=== | |
| − | + | [[mosCura:Configurator_ItemGroup|Item Group]]<br /> | |
| − | |||
| − | |||
| − | </ | ||
| − | + | ===Items=== | |
| − | + | [[mosCura:Configurator_Items|Items]]<br /> | |
| − | |||
| − | |||
| − | |||
| − | |||
| − | |||
| − | |||
| − | |||
| − | |||
| − | |||
| − | |||
| − | |||
| − | |||
| − | |||
| − | |||
| − | |||
| − | |||
| − | |||
| − | |||
| − | |||
| − | |||
| − | |||
| − | |||
| − | |||
| − | |||
| − | |||
| − | |||
| − | |||
| − | |||
| − | |||
| − | |||
| − | |||
| − | </ | ||
| − | === | + | ===Export configuration=== |
In this version of the mosCura Configurator, a functionality of exporting a configuration into a CSV file has been added. | In this version of the mosCura Configurator, a functionality of exporting a configuration into a CSV file has been added. | ||
| Line 145: | Line 54: | ||
</gallery> | </gallery> | ||
| − | === | + | ===Import configuration=== |
# In this version of mosCura Configurator, there is also the option to import an existing configuration from a CSV file or a Text file | # In this version of mosCura Configurator, there is also the option to import an existing configuration from a CSV file or a Text file | ||
| Line 161: | Line 70: | ||
</gallery> | </gallery> | ||
| − | == | + | ==Rules== |
| − | Below are | + | Below are rules, which we have set in mosCura Configurator, and the user should follow them in order to create a successful configuration: |
| − | * Section Group No. must be | + | * Section Group No. must be between 1 and 99. |
| − | * Item Group No. must be | + | * Item Group No. must be between 1 and 999. |
| − | * Item No. must be 4 characters long. | + | * Item No. must be 4 characters long fx "0001". |
* A Section group can have 1 or none Data Handler. | * A Section group can have 1 or none Data Handler. | ||
* A Data Handler can have up to three Items. | * A Data Handler can have up to three Items. | ||
Latest revision as of 15:43, 8 October 2020
Contents
Overview
mosCura Configurator is a tool that can be used to create communication protocols among different tools in the production cycle.
In the configurator, there are options to create a totally new configuration from scratch and export it into a CSV file, or to import an existing configuration in order to validate and update the existing configuration in the machine.
In the picture below is an example of a Configurator with a finished configuration:

Finished configuration

Configuration Setup
Before you proceed reading the process of a new configuration setup, it is recommended to read the Rules of the Configurator.
Configuration Process
The following steps are the process of how to create a Section Group Configuration.
- Create a new Section Group
- Add 1 Data Handler
- Add 1 or multiple Item Groups in the Section Group
- Add 1 or multiple Items in each Item Group
mosCura Configurator
In the Configurator page, it is possible to edit or delete the Section Group and create, edit or delete Data Handler, Item Group and Items.
Moreover, there are options to export the configuration or to import an existing configuration.
Section Group
Data Handler
Item Group
Items
Export configuration
In this version of the mosCura Configurator, a functionality of exporting a configuration into a CSV file has been added.
- To export the selected configuration, click the left button
 on the top panel in the right corner
 - Afterwards,you have to select the type of separator, the delimiter type for the decimal values of the configuration, and if you want the CSV to have Headers, press “Export to CSV”

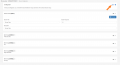
Press export

Select your preferences
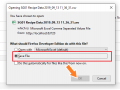
Save the file


Import configuration
- In this version of mosCura Configurator, there is also the option to import an existing configuration from a CSV file or a Text file
- To import an existing configuration, you should click the middle button
 on the top panel at the right side
 - When you have clicked the button, a new window will open. Now you have to select the type of the separator, the type of the delimiter, the type of the file, and browse to the location of the file and press “Import”
- If the import process is successful, the imported configuration will replace the existing configuration
- If the configuration contains any errors, the error(s) will be displayed in the importation window, as well as the line numbers of the file where the error(s) have occurred


Press "Import Configuration"

Select your preferences and browse to the file

Select the file and press open

Press "Import"

Error displayed


Rules
Below are rules, which we have set in mosCura Configurator, and the user should follow them in order to create a successful configuration:
- Section Group No. must be between 1 and 99.
- Item Group No. must be between 1 and 999.
- Item No. must be 4 characters long fx "0001".
- A Section group can have 1 or none Data Handler.
- A Data Handler can have up to three Items.
