Difference between revisions of "TestIT:Installation"
MartinHeide (talk | contribs) |
MartinHeide (talk | contribs) |
||
| Line 144: | Line 144: | ||
==TestIT License== | ==TestIT License== | ||
| − | |||
[[TestIT:Install_License|Install license]]<br /> | [[TestIT:Install_License|Install license]]<br /> | ||
[[TestIT:Move_License|Move license]]<br /> | [[TestIT:Move_License|Move license]]<br /> | ||
Revision as of 12:13, 9 September 2019
Contents
Installation
The process of installing TestIT includes a few steps.
- Folder structure
- Install MS SQL server 2012 Express
- Restore database
- Install TwinCat 3 – if running with I/O
- Install TestIT
- Install TestIT License
Folder structure
The files needed for the installation are placed in this folder structure. Before an installation, the Nolek folder must be copied into the C root.
The structure is:
C:/Nolek
- Applicationfiles - Guide images, text files
- Backup - Database, previous TestIT versions, etc.
- Documentation - Sequens diagram, PI diagram, etc.
- Install - Installation files (TestIT, MS SQL, TwinCat)
- License - TestIT license folder
MS SQL server 2012 Express
When MS SQL Server is being installed, both the SQL Server and the Management Studio needs to be installed.\\
MS SQL Server:
The guide to install MS SQL server:
- Install or verify the Microsoft .Net Framework 4.0
- Open the folder C:\Nolek\Install\SQL\2012 – Express and select the correct version of Windows (32 or 64 bit according to the PC)
- Double-click on the SQLEXPR_x[32 or 64]_ENU.exe file and press Run
- Select the New SQL Server stand-alone installation or add features to an existing installation
- Check the “I accept the license terms” and press Next
- Press Next in the product update
- Press Next in install setup files
- Make sure to have the Database Engine Service and SQL server Replication checked, and then press Next
- Write a name for the instance and press Next
- Wait for the setup to continue in the Next window server configuration, then press Next
- Select the Mixed Mode and write a system administrator password. Standard for TestIT is “sa4TestIT”, press Next
- Select if Error Reporting is wanted or not, and press Next
- Wait for the installation to finish and press Close
- Go to management studio setup
Management studio:
(In version 2012 the management studio is separated.)
- Install or verify the Microsoft .Net Framework 4.0
- Open the folder C:\Nolek\Install\SQL\2012 Express and select the correct version of Windows (32 or 64 bit according to the PC)
- Double-click on the SQLManagementStudio_x[32 or 64]_ENU.exe file and press Run
- Select the New SQL Server stand-alone installation or add features to an existing installation
- Wait for the Setup Support Rules and check to finish, then press Next
- Wait for the Setup files to install. Then select 'Add features…' and select the instance you just created (SQL Server) in the dropdown box, then press Next
- Select the Management Tools - Basic and press Next
- Wait for the window to change and select if Error Reporting is wanted or not, and press Next
- Wait for the installation to finish and press Close
- Go to Restore database
Restore database
Restore a full database:
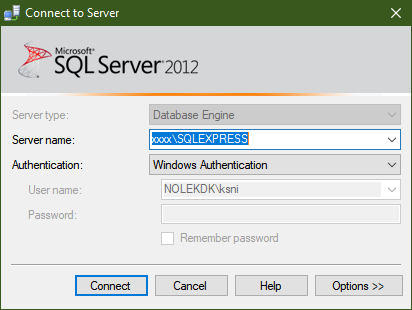
- Press "Connect":
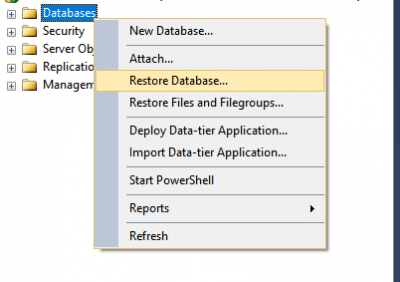
- Right click on “Databases”, and select “Restore”:
- Select “Device”, and the “…”
- Find the database to restore (TestITProd, or TestITSetup)
- Press OK
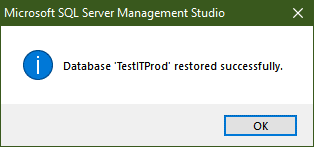
- The database is now restored.
- Close “SQL Server Management Studio”, and Open TestIT
TwinCat 3
This installation is if TestIT is running with I/O.
Install TwinCat 3:
- Open the installation folder: C:\Nolek\Install\TwinCat
- Double-click on the setup file and press Next
- Select 'I accept the terms in the license agreement', and press Next
- Write user name and organization
- Select Custom, and press Next
- May vary depending on the installed software. Select Microsoft… and press 'Next'
- Press Install, then Next and in the end press Finish
- Restart the system
Create a new TwinCat project:
- Open Visual Studio to create a new project
- Select Start and then New project
- Select TwinCAT Project and then the TwinCAT XAE Project (XML format)
- Write a name: 'TwinCAT IO'
- Select location (where to save the file) and press OK
This page will be visible. Note! Your window may look different.
Setup the communication port:
- Select TwinCat
- Select Show Realtime Ethernet Compatible Devices…
- Select the network card to use for TwinCat, and press Enable
- Now, follow the instructions of new task, IO configuration, and IO scan (descripted below)
- After this, go to Install TestIT
New task:
- Right-click on tasks and select add new item
- Write the name IO, and write comment if there are any and press OK
- Verify that the task is created
- Double-click on IO and verify that the settings look like the image. Maybe the port number is 350 – That is ok
IO Configuration:
- Right-click on inputs or on output, and select Add new item
- Enter the symbol configuration. (Eg. Name: IN01, DataType: Bool) and press OK
- The name and description can be changed; just double-click on the symbol and change it
- Repeat for all symbols
IO Scan:
- Connect the I/O modules
Install TestIT
Install TestIT:
- Go to the installation folder (C:\Nolek\Install\TestIT)
- Double-click on the setup.exe file
- Press Install and follow the instructions of TestIT License
When the TestIT application is installed, TestIT will open and the database connection must be set up.
TestIT License
- Write the license number from the license document. (Eg: TestLicense or 16L1234)
- Press New and two options will appear:
- With a license: Select a destination folder. The recommend folder is C:\Nolek\License
- Email the license request file to info@nolek.dk
- When the response file is received from Nolek, save it on the hard drive
- Select the Load button and select the file
- The license is installed and the application can be closed
- Without a license: Select Run in demo, and an access is available in two hours
- With a license: Select a destination folder. The recommend folder is C:\Nolek\License
Next time TestIT is opened, it will be licensed.


