Difference between revisions of "mosCura:Report"
| Line 49: | Line 49: | ||
#Connect to the machine of your choice. | #Connect to the machine of your choice. | ||
#Navigate in the left side menu and press "Machine Config" | #Navigate in the left side menu and press "Machine Config" | ||
| − | #Locate the "Shared report" button at bottom of the page and press | + | #Locate the "Shared report" button at bottom of the page and press <galery>File:report_machine_shared_plus_button.PNG</galery> |
Revision as of 15:49, 5 September 2019
Contents
10.1 Overview
mosCura Report Generator is a tool that can be used in order to create certificate reports of a tested part.
In Report Generator, after the user has generated a Report, there are multiple options for the type of the exportation. For example the Report can be exported into PDF, Excel files and more.
In order to make the Report Generator more efficient for the users of mosCura, we have created two areas where the users can work with the Reports. The first area is the Admin area, where in this area the Admin can configure a Report that can be used from all the users in the specific machine.
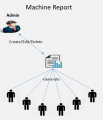
Admin Rights

The second area of the Report Generator is only for each user of mosCura, where in this area each user can handle the report he prefers.
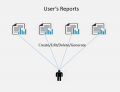
User Rights

10.2 Report Settings
Before the actual configuration of a Report the admin has to set the values in the Report settings, in this version the settings that required are how many Columns and Rows a user can select in the Report designer.
In order to setup the settings of the report the Admin has to:
- Connect to the machine.
- Then in the left side bar navigate in the Report section, Setup and press "Settings".
- In the page there are two input fields, fill in both fields and press "Save", by default the values are 30 for Rows and 1 for the Columns.

1. Report Settings Menu

2. Settings Inputs

3. Settings Save


10.3 Report Configuration
As it mentioned in the introduction, there are two Areas for the Report Generator the Admin and the User. The process of the configuration carried out in three steps
- Report Template selection
- The user selects the Report Design
- Static Information
- The user types in the information of the Report such as the Certification Info, Customer Info and the Test info
- Query Designer
- In this step is the most important action from the user, where decides what data should the report calculate and display in the diagram.
10.3.1 Admin Report Configuration
When an Admin creates a configuration for a Report, this configuration can only be edited or deleted by the Admin, all the rest connected Users in the Machine they can just generate the Report.
To start the process of report configuration:
- Connect to the machine of your choice.
- Navigate in the left side menu and press "Machine Config"
- Locate the "Shared report" button at bottom of the page and press <galery>File:report_machine_shared_plus_button.PNG</galery>
