Difference between revisions of "mosCura:Configurator ItemGroup"
Jump to navigation
Jump to search
(Created page with "'''Create''' # To create a new Item Group, click on the dropdown button, which is located in the Section Group panel in the right corner, and press “+Item Group” # When y...") |
|||
| Line 40: | Line 40: | ||
File:mosCura_configurator_ItemGroup_CopyInput.png|Fill in all the inputs and press "Create" | File:mosCura_configurator_ItemGroup_CopyInput.png|Fill in all the inputs and press "Create" | ||
</gallery> | </gallery> | ||
| + | |||
| + | |||
| + | [[mosCura:Configurator|Back to Configurator]]<br /> | ||
Latest revision as of 10:41, 21 November 2019
Create
- To create a new Item Group, click on the dropdown button, which is located in the Section Group panel in the right corner, and press “+Item Group”
- When you have clicked the button, a new window will pop up with the required inputs. Fill in all the fields and press “Create”
- When the process is finished, a new panel with the Item group will be placed under the Data Handler or the Section Group

Press "+Item Group"
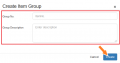
Fill in the inputs and press "Create"


Update
- To update an Item group, click on the dropdown button and press “Edit Item Group”
- When you have clicked the button, a window with the values of the selected Item group will be displayed. Replace the existing values with the new one and press “Update”
- When the process is ready, you will see that the name of the Item Group has changed, and also the Tag No.

Press "Edit Item Group"
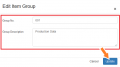
Change the values in the inputs and press "Update"


Delete
- To delete an Item Group and all the Items inside, you have to extend the dropdown button and select “Delete Group”
- When you have pressed “Delete Group”, a confirmation message will be displayed. Press “OK” to continue or “Cancel” to cancel the process

Click "Delete Group"
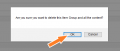
Press "Ok" to confirm the process


Copy
In mosCura Configurator we have added a feature to make the process of creating an Item Group very easy. The feature that helps is the possibility to create a copy of an existing Item Group with all its Items.
- To create a copy of an Item Group, in the selected Item Group extend the dropdown button and select “Copy Item Group”.
- Now that the option has been selected a new window will pop up with the required inputs. Fill in all the fields and press “Create” to continue the process or “Cancel” to stop it.

Press "Copy Item Group"
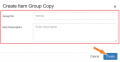
Fill in all the inputs and press "Create"


