Difference between revisions of "mosCura:Report"
| (57 intermediate revisions by the same user not shown) | |||
| Line 1: | Line 1: | ||
| − | == | + | ==Overview== |
| − | mosCura Report | + | mosCura Report Designer is a tool that can be used in order to create certificate reports of a tested part. |
| − | In Report | + | In Report Designer, after the user has generated a Report, there are multiple options for the type of the exportation. For example the Report can be exported into PDF, Excel files and more. |
| − | In order to make the Report | + | In order to make the Report Designer more efficient for the users of mosCura, we have created two areas where the users can work with the Reports. |
The first area is the Admin area, where in this area the Admin can configure a Report that can be used from all the users in the specific machine. | The first area is the Admin area, where in this area the Admin can configure a Report that can be used from all the users in the specific machine. | ||
| + | |||
| + | The second area of the Report Designer is only for each user of mosCura, where in this area each user can handle the report he prefers. | ||
<gallery> | <gallery> | ||
File:AdminArea.PNG|Admin Rights | File:AdminArea.PNG|Admin Rights | ||
| + | File:Report_user_area.PNG|User Rights | ||
</gallery> | </gallery> | ||
| − | + | ==Report Design== | |
| − | < | + | As it mentioned in the introduction, the Report Designer has been split into two Areas the Admin and the User. |
| − | + | ||
| − | </ | + | ===Admin Report === |
| + | |||
| + | When an Admin design a Report, the design of the report can only be edited or deleted by the Admin, all the rest connected Users in the Machine they can only generate the Report. | ||
| + | |||
| + | [[mosCura:Admin_Design|Admin Design]]<br /> | ||
| + | |||
| + | [[mosCura:Admin_ReportHandler|Admin Report Handler]]<br /> | ||
| + | |||
| + | ===User Report === | ||
| + | |||
| + | In mosCura the user has the possibility to create personal reports, which can only be accessed by the user. | ||
| + | |||
| + | [[mosCura:User_Design|User Design]]<br /> | ||
| + | |||
| + | ===Report Deisgner Features === | ||
| + | In the Report Designer the user can build from a very simple Report with one label inside, up to a very complex Report with multiple charts and pivot tables based on the SQL source. | ||
| + | |||
| + | [[mosCura:Report_Designer_Feature|Report Designer Features]]<br /> | ||
| − | == | + | ==Report Generation== |
| − | + | As it mentioned in the previous section there are two types of Report in mosCura, the User's report and the shared Report.Both Reports can be found under the Report menu. | |
| − | + | Under the Report menu are the Shared Reports, and under the My Reports are the User's Report. | |
| − | |||
| − | |||
| − | |||
<gallery> | <gallery> | ||
| − | File: | + | File:MosCura_Report_Generate_Menu.png| Report Menu |
| − | |||
| − | |||
</gallery> | </gallery> | ||
| − | + | In order to generate a Report: | |
| − | + | #Select the Report you want from the menu | |
| − | + | #Type in the input values in the parameter panel or let the default values | |
| + | #Scroll down until you see the Submit button and click it | ||
| − | |||
| − | |||
| − | |||
| − | |||
| − | |||
| − | |||
| − | + | <gallery> | |
| − | + | File:MosCura_Report_Generate_BeforeSubmit.png| Report Load | |
| − | + | File:MosCura_Report_Generate_Submit_Btn.png| Submit | |
| − | + | File:MosCura_Report_Generate_Report1.png| Generated Report 1st Page | |
| − | + | File:MosCura_Report_Generate_Report2.png| Generated Report 2nd Page | |
| − | + | </gallery> | |
| − | |||
| − | |||
Latest revision as of 13:32, 8 October 2020
Contents
Overview
mosCura Report Designer is a tool that can be used in order to create certificate reports of a tested part.
In Report Designer, after the user has generated a Report, there are multiple options for the type of the exportation. For example the Report can be exported into PDF, Excel files and more.
In order to make the Report Designer more efficient for the users of mosCura, we have created two areas where the users can work with the Reports. The first area is the Admin area, where in this area the Admin can configure a Report that can be used from all the users in the specific machine.
The second area of the Report Designer is only for each user of mosCura, where in this area each user can handle the report he prefers.
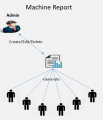
Admin Rights
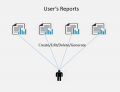
User Rights


Report Design
As it mentioned in the introduction, the Report Designer has been split into two Areas the Admin and the User.
Admin Report
When an Admin design a Report, the design of the report can only be edited or deleted by the Admin, all the rest connected Users in the Machine they can only generate the Report.
User Report
In mosCura the user has the possibility to create personal reports, which can only be accessed by the user.
Report Deisgner Features
In the Report Designer the user can build from a very simple Report with one label inside, up to a very complex Report with multiple charts and pivot tables based on the SQL source.
Report Generation
As it mentioned in the previous section there are two types of Report in mosCura, the User's report and the shared Report.Both Reports can be found under the Report menu.
Under the Report menu are the Shared Reports, and under the My Reports are the User's Report.
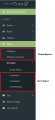
Report Menu

In order to generate a Report:
- Select the Report you want from the menu
- Type in the input values in the parameter panel or let the default values
- Scroll down until you see the Submit button and click it
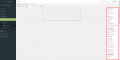
Report Load
Submit
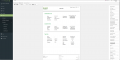
Generated Report 1st Page

Generated Report 2nd Page


